Most of us might have saved web pages while browsing and it might have struggled a lot in managing those pages since saving a single page will result in lots of files in the disk and the broken links. I have often see my friends trying to save some web sites by clicking each links in the page and trying to save those pages individually. But life can be made easy if you follow some painless steps while saving the web pages. I often follow these steps if I need to save a web page.
- Use a web copier/Off line browser for saving an entire website to the disk. This will help you to browse the saved web page as if you are browsing online.
- There are so many softwares available for this purpose, but to my experience WinHTTrack is the best one. It is a free ware and works good. (Click the link to go to the WinHTTrack download page)
- Run the program after installing it.
- Keep the default settings for the proxy and other things.
- Give appropriate name to the project and click next to continue.
- Here give the name of the website(s) you want to download in the URL box.
- Click next, keep default settings and click finish to start copying the website.
- When httrack finishes copying the web site you can find a file called index.html on the project folder you have chosen, double click the file to open the saved web page.
- Now you have the web page copied on your computer and can browse it.
- But even this could cause problems while copying it to some other drive or moving it. It also consumes large space in disk (larger than total size of all files) . This is because each page is contained of many small files. But in the disk there is term called cluster size which gives the minimum space which can be allocated for saving a file. For example if there is a file of 1KB and the cluster size is 4KB, then that file will take a minimum of 4KB on the disk and the rest of the 3KB will remain empty. But if we makes the entire file into a single one like zip archeive, then we can save a lot of space on the disk.
- This can be made possible mainly in two ways (according to my knowledge). First one is to make it .CHM (windows compiled html help file) file or use custom packager softwares like WebSiteZip Packer which is a free EBook Compiler (Here you will also get option to password protect the output file).
- Download and install WebSiteZip Packer.
- When you run it you will see something like this.
- click the wizard button and the click next.
- Now click the homepage button and browse to the index.html file in the project folder of the website copied using httrack.
- Click next and select EXE format for getting a stand alone E-book.
- Give the output file name and click next.
- Now you can keep the default settings or make changes as you like till you reach the page below.
- In this page check the option if you want to make the output from files which was taken from different sites.
- Now click next, and make changes if you want and click Finish to start compiling the EBook from web site.
- If you search the net for chm compilers or html to chm converters, the you will get so many softwares. But most of them will be sharewares or trials having limitations and expiry period.
- Of these most the have similar interface as that of WebSiteZip Packer and can be used in a similar way.
- One of chm builder which I found useful is Easy chm. It comes as a 30 day trial.
- Screen shot of Easy Chm.
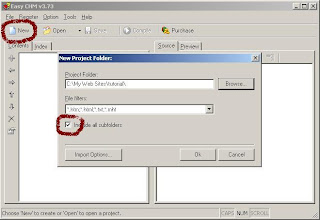
- Click the new button to start the new project.
- Then select the folder containing downloaded files as the project folder. Make sure that the "Include sub directories box is selected".
- If the site contains files other than listed extensions the choose *.* from the dropdown menu and click ok.
- Now click the preview tab to see the preview of the web pages.
- The unnecessary folders like the cache created by the httrack by selecting it and clicling the 'x' button, if necessary other files can be added by clicking the '+' button.
- When everything is over click the compile button.
- Make changes if necessary and click the create button to create the CHM output file.


